Friday, December 23, 2011

rebecca's favorite polishes of 2011 - #8


Hey everyone! I'm really excited to show you today's polish! So let's get right to it.


My #8 favorite polish is Butter London - No More Waity, Katie. (If you live under a rock, the name refers to Price William's now-wife and the long wait she had before marrying into the royal family.)

I wanted this polish for 2 reasons:
1) The color is awesome, and I love the glitter.
2) My nan was always interested in the royal family so I figured it would be neat to have this, and it reminds me of her.

Butter London is not sold here so I swapped with Brie for this baby!

Let's see the swatches!


For these photos I layered 2 coats of No More Waity, Katie over 2 coats of Zoya Caitlin.
Caitlin is the perfect underwear for NMWK - it's a bit sheer on its own and it is easier to layer it!


I just love that it is this great neutral color with some very pretty lilac glitter that looks so cool suspended in the layers of jelly.
Here's how it looks on its own:


As you can see it is a bit sheer in places and I find it hard to apply the three necessary coats neatly. I will continue to layer it!

Do you guys have Waity Katie? I know a lot of people were disappointed with this one, but I sure wasn't!

I wonder what Kayla chose for her #8 polish! Go check it out!

Thursday, December 22, 2011

rebecca's favorite polishes of 2011 - #9


Hey everyone! Ready to see #9?


Lynnderella - Gotta Love Brains is my #9 favorite polish of 2011.

If you've never heard of Lynnderella, she is a lovely lady who is selling her frankens to the masses! She has some seriously awesome creations. I got this baby in a swap with my Brazilian friend, Marilia!
It's hard to get your hands on Lynnderella's because she makes them in pretty small quantities.
Keep an eye on her blog to see her polishes and find out times of her sales.

Now let's see this polish in action!


Isn't this beautiful? So many cool glitters! And there is a purple shimmer running through the polish which makes it even more awesome. Click the photos to enlarge them and see them up close.

For these photos I layered two coats of Gotta Love Brains over 2 coats of Soulstice Spa - Manchester. Manchester is the perfect light gray base to layer this over!


I'm really stoked to have been able to get this. I have another Lynnderella on the way from another swap! Can't wait to get that one and show it to you guys as well.

Another great thing about this polish? It makes for a cool ring!


See all the shimmer? Love!

What do you guys think? Does this one deserve to be in the top 10?

And don't forget to check out Kayla Shevonne's #9 today! I wonder what she chose!

Wednesday, December 21, 2011

rebecca's favorite polishes of 2011 - #10


Hello and welcome to my favorite polishes countdown!
Are you excited to find out what polishes found a place on my Top 10 of 2011 list? Because I'm excited to show you!

Before we get started I want to mention that my good friend Kayla Shevonne is also counting down her top 10! We decided to sync our posts. Hopefully you all enjoy it!
Don't forget to go check out her #10 as well.

Drumroll please...


I had a super hard time deciding which polish was going to be #10. I had probably 20 other polishes in the running for the #10 spot.
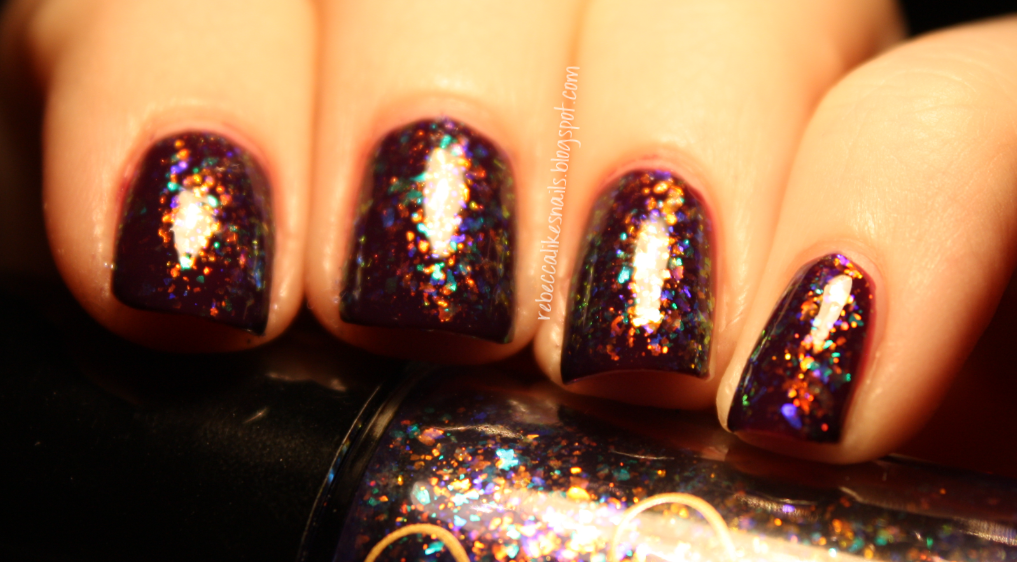
Eventually I decided it had to be Cult Nails - Unicorn Puke after remembering the mani I recently showed you with it.

For my swatches today I layered it over a dark purple creme to show off the flakies more. (China Glaze Urban-Night)


Love! I don't like the orange-green shift flakies on their own but the mixture of colors in this one makes it awesome!
This is 2 coats over 2 coats of the base color.

One thing that annoys me though...


The brush does this all the time. The very first time I opened the bottle it did this! Small annoyance but for the price of Cult Nails polishes you would expect this not to happen.

Let's take one last look at the wicked mani I did with this before.


Just can't get enough!

Make sure to keep an eye out for the next polish tomorrow!
And check out Kayla's if you haven't already.
Have a lovely day!

Tuesday, December 20, 2011

Born Pretty - Fimo Review!


Hi everyone! Look at the cool stuff I have to show you today!
Born Pretty generously sent me this fimo set to review.

As you can see, it comes with 100 canes, 2 empty wheels to put your fimo in, as well as some super glue and blades for cutting the canes.

I prefer to use topcoat to adhere the fimo to my nails but you can also use fimo for things like decorating cellphones or other trinkets or even scrapbooking! You could use the superglue in those cases.
(However I really like the super glue for making nail polish jewelery!)

I wanted to show you all the fimo you get so I took pictures:


So many cute ones! I especially love the hibiscus flowers, the fruit, and of course the cupcakes!


Another cute one is the watermelon because you can use them whole or cut them lengthwise to make half slices!

I cut up one entire cane to show you how many pieces you get from one cane.

A whole lot!
But it does take some practice to cut the pieces the right size - you will make some mistakes!


But you make more good ones than mistakes. You get the hang of it!


You have to practice cutting them thin so they will lie more flat on the nail.


One cane makes so many that they totally fill a compartment in the wheel!

Now I'm going to show you some looks I did with this fimo!


Fruit fimo manis are some of the most popular! They are super cute, especially in the summer.
(Polish color - Orly Frolic)


I love the pink grapefruit one!


This is a mani I did that is more winter-appropriate! This snowflake fimo is really cute. I got a lot of compliments on it!
(Polish colors - Zoya Neeka with a glitter franken)


The fimo pieces do stick off of your nail a bit depending on how thick you cut them but you can mostly flatten them with a few coats of topcoat.

Here is the link to this item on Born Pretty.
As always, they ship for free, world wide!
And don't forget, you can still get 10% off anything with my code RCJ61! It's only valid until the end of the month so if you are thinking about buying something, now is the time!


(As well - their stamping plates are all on sale for $1.55! You can't use the discount code on the special priced items but $1.55 is a steal! They have dupes of a bunch of the best Konad plates. I bought 7...)

Tomorrow I am starting an exciting posting series! I decided on my top 10 polishes of 2011. Stay tuned tomorrow for #10!

Monday, December 19, 2011

baking post: oreo cookie brownie bars!

Hi everyone! I decided to do a baking post for you today in case anyone is looking for some totally sinful treats to make for the holidays!
I will most likely be making some more goodies over the next couple of days and I will show you those as well at some point.

(Disclaimer: I am not responsible for the 10 pounds you might gain if you make the following recipe.)

I didn't actually make these for the holidays, it was back in October - myself and my bestie Emma found this recipe online (simultaneously) and knew we had to make it.
Here is the link to the original. You might want to think twice about clicking it because they even involve ice cream and hot fudge in this fiasco and the pictures should be illegal.

Now I will show you my process and results!


This is the concoction Emma and I made. Yes, this is made of chocolate chip cookies, Oreos, and brownies. All in the one bar. It is delightful! (And calorie-laden.)

Let me show you how you make them. Continue at own risk.


Make an entire batch of cookie dough and spread it into a glass baking dish that you have lined with parchment paper. Make sure it covers the bottom. Resist eating dough.

Emma the hand model is wearing For Audrey I believe. And look at that stamping! She is my protege. I taught her everything I know!


Line the dish with an entire box of Double Stuff Oreos. Yes, the whole box. Resist eating Oreos because you need them all.
(Emma and I thought we would have Oreos to munch on while the monster was in the oven - as if we needed to eat anything in preparation for that sucker - but then they all fit into the dish. )


Mix up an entire batch of brownies and pour it over the top.
We used a Godiva brownie mix which was freaking delicious. But I think a cheaper mix might be better because it would likely be less dense and would be easier to bake.


Resist urge to just pick up an Oreo and eat it like chips and dip.
(Actually that might be a good future idea.)


Now it's time to put your calorie loaf into the oven.


The recipe says 350 degrees for 45-55 minutes but we had issues with that.
We took it out at 55 minutes, thinking it was done. We let it cool for 10 minutes or so and when we checked on it, we realized that the brownies were still liquid under the surface.


We had to put it back in the oven and bake it for another half an hour or more. This is why I think you should use a different brownie mix - it might be less rich and dense and therefore bake quicker.


Having to bake it twice really made the edges hard so it didn't turn out as wonderful as it should have.
However!
I learned a baking tip from a friend on facebook - if your cookies or any other baked goods end up too hard, seal them in a container with a slice or two of bread. The moisture from the bread will transfer into the cookies. And it seriously worked! They ended up soft and chewy, even the edges.
(Thanks for the tip, Anissa!)


You use the parchment paper to lift it out of the pan, peel away the paper, cut into chunks, and eat.
(But believe you me, it is not easy to eat much at once. Soooooo decadent.)


I also want to mention that I think these are much better once they have cooled completely. It's easier to taste all the different components that way!


Nom nom nom.
Do you want to make these now? Don't say I didn't warn you!

I still have half of this batch in my freezer. Every now and then I take out a piece and thaw it! It's better that way because you don't end up eating 5 pieces in a day. (Unless you thaw that many at once but you have more willpower than that. I believe in you.)

Let me know if you make these!